Blues for Beginners
Basic Technique 1
Basic Technique 1
|
This lesson will give you some basic tips on your technique. While you can always correct "bad", or inefficient technique, it is much easier and better to head off any bad habits in the first place. Finding a good teacher and taking private lessons is the best way to achieve that. Still, by following the basic guidelines given in this and the next lessons you will be able to develop a good technique on the guitar.
As I alluded to above, "good" is synonymous with "efficient" with regard to technique. What you want to achieve is mechanical efficiency - while developing a sensitive touch on the guitar. The mechanics make the execution possible while the touch makes it musical. If this seems too esoteric or beyond your comprehension right now, don't worry. You'll get it. Developing touch takes time and practice and it begins to appear on its own, if you just pay attention to how it feels to play. The mechanics become second nature after you practice them for a while, at which point you don't have to think about them.
proper position from behind
The thumb of your left hand should be behind your first and second fingers - with the neck in between them, of course. You want to have daylight between the neck of the guitar and your left palm. Only your thumb should be on the back of the neck. Avoid pressing the palm of your hand against the neck. The first knuckle of the thumb should be bent backwards. Press with the pad of the thumb. (Later, when you learn string-bending, as well as some vibrato and chording techniques, you'll occasionally ignore this basic rule, but for now, obey it religiously.) Here's what it should look like:
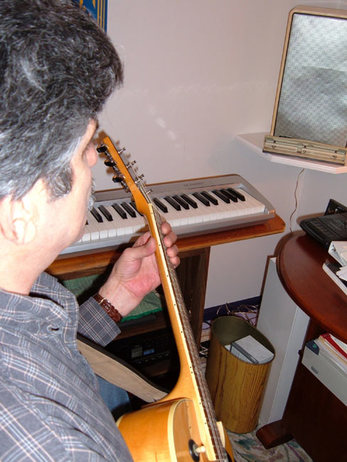
There is a fair amount of latitude in how you hold the guitar in your lap. You can set it on your right or left knee. However you rest it, you want to be sure that the neck doesn't stick too far out from your body - you don't want to have to reach out too much to play. I usually recommend to my students that they use a strap to help stabilize the guitar and to help them achieve a consistent position. 
proper posture and position
|
A relaxed posture is essential to begin with. Sit up erect but not rigid. Let your shoulders drop and elbows relax. Hold the guitar lightly with your right arm and sort of hang on to the fingerboard with the fingertips of your left hand. The weight of your arm should provide enough pressure to sound a note. You don't need to grip hard on the neck with your left hand thumb and fingers. Lightly lay your fingertips on the strings, and don't press hard enough to actually sound a note. Take careful note of how that feels. Notice how good it feels to lay you hand on the guitar with a light and relaxed touch. That's what you want to feel all of the time. Remember, you're holding a musical instrument - not a baseball bat!
(Obviously, left-handed players must reverse these instructions, but it still works the same way.) 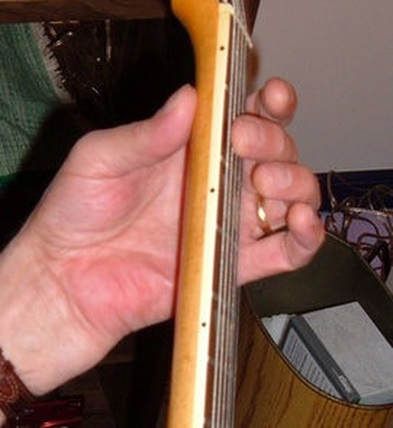
The neck should angle up a little. It can also angle out from your body some. Experiment with these angles of the neck until you find a position which feels comfortable to you. The following photos show a basic position from which you can start to find your unique way of holding the guitar.
Focus on these elements of technique as you practice. Eventually you will automatically and without thinking play in this way. They will become habits, but good ones. Now, if you are an absolute beginner, start working on Boogie Woogie 1, the first study. After you have learned that study, go to the next - First Boogie in A. If the first study is too simple for you, go directly to First Boogie in A. Follow the fingerings given in the score exactly. The accompanying audio files will help you hear what they both should sound like. There are a slow versions as well as a full tempo ones for each study. There are full tempo and slow rhythm only versions for both studies so that you can play along without the lead part on the recordings. |